Good Times with Shaders
Another month has passed! I feel like I’m getting in to the swing of writing these blog posts. Since the last episode I’ve done a lot of work on the game visuals and especially in the UI. So without further ado here’s the change notes for this month’s dev work:
Created Unit animations for walking and idle states
Added palette swapping on units to support configurable skin tones and hair colors
Added a Pause Menu
Created a custom font
Migrated all the in-game fonts
Revamped every UI in the game
Controller support + input glyph support
New loading screen
Fog of war & weather presets
Learned Blender
Rebuilt town wall sections using Blender
Integrated YarnSpinner for better dialogue scripting
Downloaded Fmod
A friend asked me how I get so much done and the secret is to be consumed by the project every waking moment.
Ok starting things off I created walking and idle animations for our core 5 classes (Yeoman, Acolyte, Scion, Wretch, and Chevalier) so now those classes have walking animations when they’re moving around the map and slow idle animations to give the game a bit of motion while they’re just sitting around. Prior to this change I was using a static sprite render on the unit game object for all units. In order to get all the animations hooked up and on their respective units, I had to make prefabs for each unit class and set up animation controller overrides.
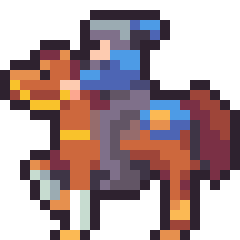
Prancing Horsey
I was starting to hit a problem doing the animations, which is that up until this point each unit image was hand made, meaning I had separate images for enemy yeoman and friendly yeoman. But I was struggling with the idea of having to create 3-4 animations for every unit for every shirt color, for every skin tone, for every hair color, for every weapon (yes we have specific weapon art) This was just too much. So I did some research and ended up creating a shader that will palette swap the unit art for shirt color, hair color and skin tone, meaning my possible combinations decreased significantly.
The way it works is that we have 8 or 9 “greenscreen” colors defined that just happen to have the 9 lowest Red values of any colors in our game’s palette. So the shader sorts all colors by R into an array and if it wants to render a color it does a simple lookup as to whether to swap out the color or not. I then generate a 1x256 texture that contains the target colors for a unit based on the selected hair, skin, and shirt color and the shader swaps to those colors. It’s all very fancy.

Green screen Landsknect
Changing gears I had a goal from last time to revamp all the UI in the game, which I did! It was a lot of UI. Early in the project I had made very simple UIs partly because I wasn’t comfortable with the system yet and partly because I didn’t know what kinds of information I’d need to present. So I have been wanting to go back and update a lot of them. Especially the equipment select and action preview screens needed a lot of work.
I got to take advantage of our fancy new progress bars from MMF_Feel and overall I think the clarity of the game has improved significantly. The full list of UIs that I updated are:
Pause Menu (new)
Battle Prep menu
Equipment Management menu
Promotion Menu
Battle Participation menu (unit select)
Unit Inspection menu
Unit info menu (top corner panel)
Game Log
Terrain Info Menu
Objective Info Menu
Equipment Selection Menu
Action Preview Menu
Loading Screen
About 95% of all the UI in the game got at least a small update.


Speaking of the loading screen, this got a big overhaul. It was kind of a placeholder screen before but I wanted to do something cool with it. I saw someone on Bluesky post a while back “what’s the point of making your own game if you don’t build a sick loading screen?” and that stuck with me.
The loading screen is actually another custom shader that interpolates between the “sketch” image and the final painting. It only has one set of images right now but I’m in the process of painting a bunch more.
Along with my great UI revamp I swapped all the game’s fonts and ended up creating a custom font just for the game! I realised that I had spent a lot of time making sure that the UI was pixel perfect but that I was cheating when it came to fonts, so I really needed to get fonts that would render at the same pixel density as the rest of the game. I picked up a pack of fonts which I use for the Heading font and the small text, but I didn’t have a good one for the medium headers.

Showing off Rathdrum Serif
I did some research and found this tool online for creating custom pixel fonts and after a few days trial and error I ended up creating an 11 pixel font I’m calling Rathdrum Serif.
Along with the font work came controller support and input glyphs. I had some stuff in old builds that was just kind of a placeholder, but I got a pack of input glyphs from Kenny assets and added them to my emoji system. I was already pretty well set up for controller support and all the input hint text auto detects the most recently used input device and changes to that set of glyphs.
The last big feature of this month was fog of war and weather presets. A lot of classic fire emblem games have night time or fog levels where you don’t know where the enemy is until they’re right in your face. So this was on my feature list from day 1. Each unit has a radius of visibility they have and there are also game board objects that can give or remove visibility as well. This will allow me to hide the inside of a sealed room even during the daytime preset. This was the third custom shader of the month as the fog is a large texture that fills in based on the visibility of the tile below it. Those tiles are stored in a small generated texture with 1 pixel = 1 tile.


With the weather presets I was playing around with the game’s lighting and the walls in the city tileset have never respected the lighting in the game. They were created by attaching sprites to the outsides of a unit cube primitive, so each one is actually 6 draw calls. I knew I’d need to change this. I started trying to build them out with Crototile3D but just kept bouncing off of it. No offence to the tool, I think it’s very cool but just couldn’t get in the flow. I decided to take a shot using Blender and had a lot more success, I was able to migrate all the Tudor walls in the game and now they light correctly and are much more efficient to render. I need to do some more complex shapes for the door and some other doodads around the map so wish me luck!

Showing off lighting on these Tudor walls.
Finally to round things off I had a couple integrations. I decided that I am going to use YarnSpinner to help manage cutscenes and I started that work by replacing the existing dialogue manager with one that is backed by Yarn Spinner as a proof of concept. I just finished that today (as of the writing of this blog) and it seems to be working great. I also downloaded Fmod and started to integrate it but got scared. I am going to be working with a very cool composer (you heard it here first) and he wanted to use Fmod so I’m going to sit down with him and make sure I get it set up the way he wants it.
For December, I think I will focus on polish. I have a nice lil bug list going at the moment and will try and bring in some additional art/animations before cutting another demo by year’s end. I also need to take the time to really dig into the game story which I’ve been neglecting for fun programming tasks, but sigh I guess I’ll go write some stuff.
Until then.